If you’ve ever considered taking on a Mustang Fastback conversion, then we have some help for you. We have successfully converted a coupe to fastback twice now. We will take you step by step through the process, so you can see what you’re in for when you take-on a Ford Mustang Fastback conversion.
Our blog is reader-supported. We may earn an affiliate commission from product links.
Are you ready?
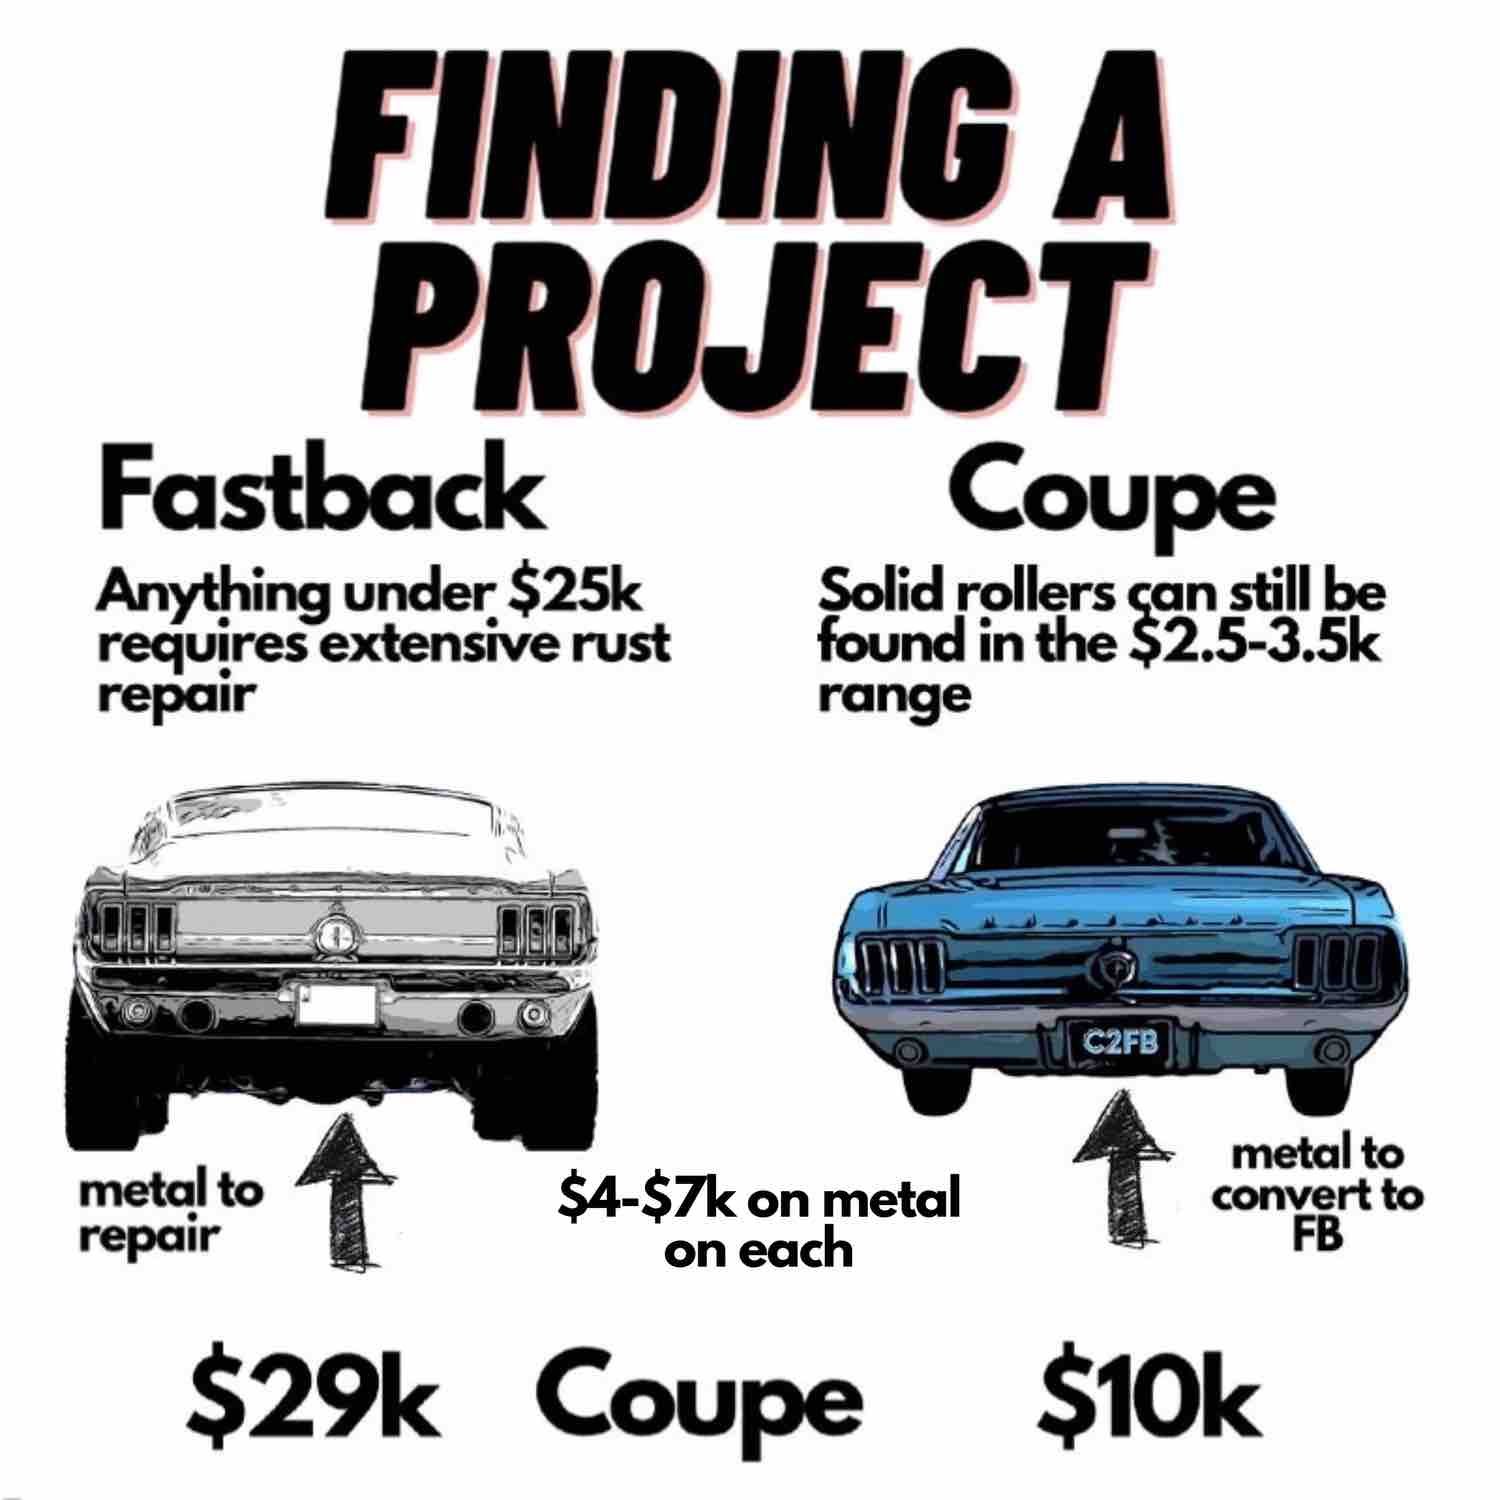
If you’re on the fence about doing a Fastback Conversion, check out this post, where we introduce and give some background information on a Mustang Fastback conversion, the cost of a fastback conversion kit and help you decide if this is a project you’d consider taking on. Then head back to this page!
If you’re ready to read on… LET’S GET TO IT!
STEP 1- Find a Coupe

We have had the best luck finding a vehicle via a Facebook Marketplace or Craigslist search.
You can choose a completed Mustang coupe with all the parts and components. Or if you want a full restoration project or want to customize everything, choose a shell. It really depends on how much you are willing to put into it after the conversion is complete.
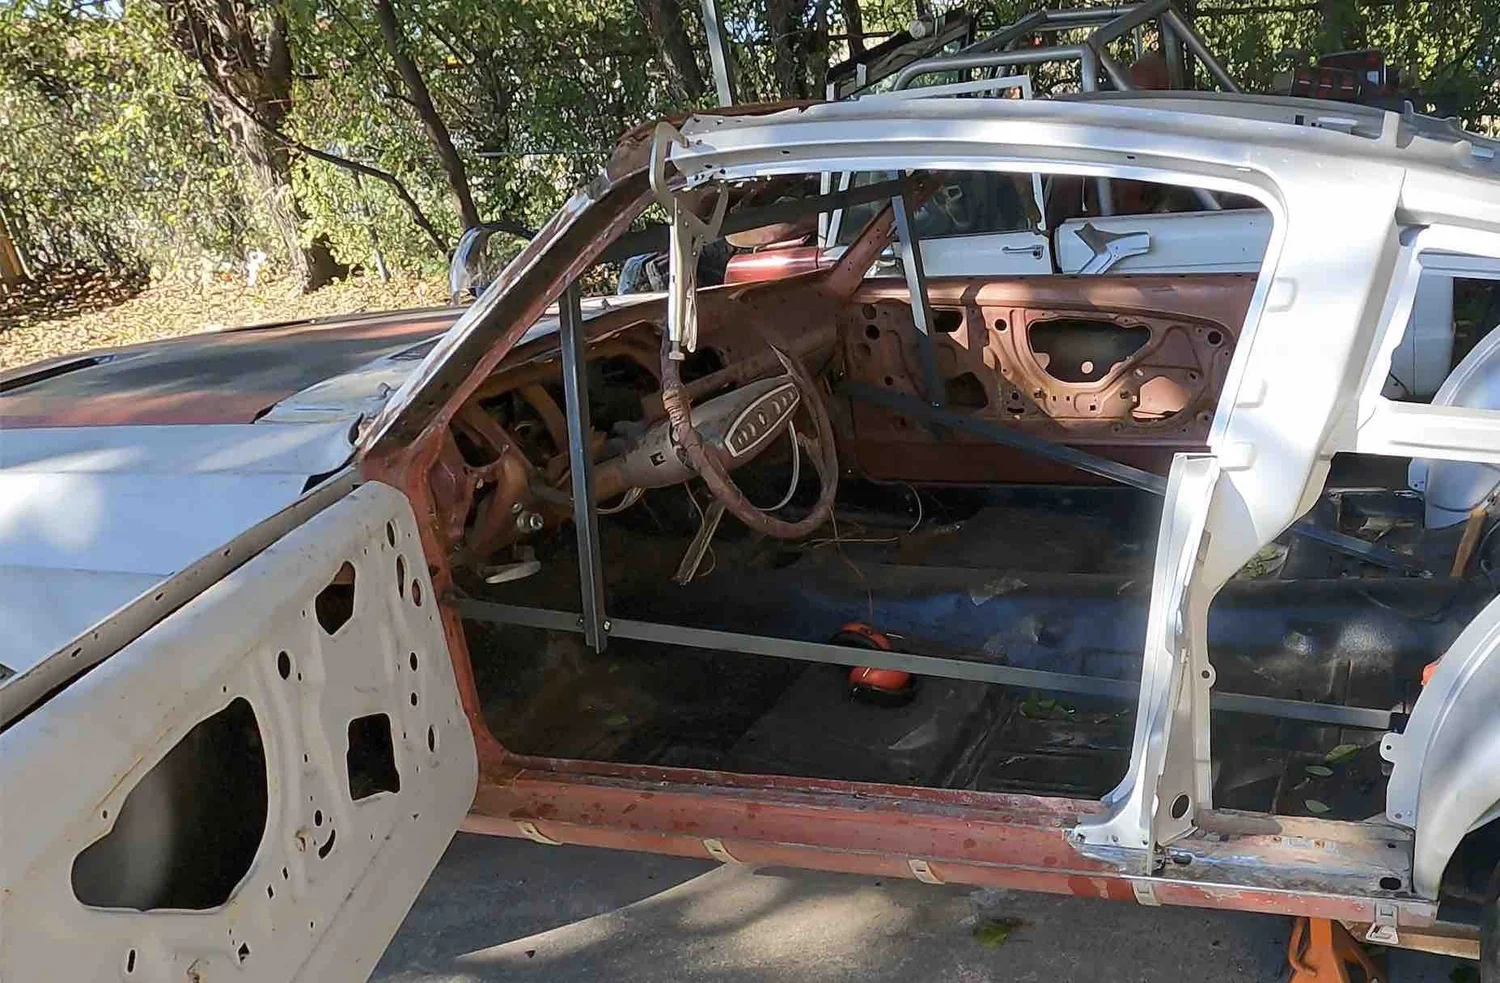
Just know that when you are in the conversion process, what ever interior pieces are in the coupe will have to be taken out before you start cutting and adding the new metal. That rear seat and carpet doesn’t stand a chance against all that metal work.
STEP 2- Order a Fastback Conversion Kit
Full-Kit Option
You can order all of the needed reproduction Fastback body panels in a single Fastback conversion kit, such as one of these from Kentucky Mustangs.
Individual Pieces Option
You can also find all of individual pieces of metal for a 1967-1968 Mustang Fastback conversion in this parts list we have created. When you buy the un-assembled inner structures, it will save you about $400-$500 per side. Go this route if your inner and outer wheel wells are in good shape.
*NOTE: PLAN ACCORDINGLY
When planning you project timeline, consider the time needed for freight shipping. It might take a while to get your fastback conversion kit in.
Also, if you would like to save some money on your fastback conversion kit, plan to order around a holiday when an online shop offers a sale price.
STEP 3- Evaluate Your Tools and Supplies
It’s all about dimensions and the tools to get there to complete a successful coupe to fastback conversion.
You don’t need super fancy tools for a fastback conversion but just the mindset to take your time and the ingenuity to use what you have.
We do recommend having some solid, quality basics, though.
Recommended Tools and Supplies
STEP 4- Take Dimensions and Mock-Up
When things are not in specs you get off course in a serious way! Having correct dimensions of the body and double and triple checking is essential to an accurate fastback conversion.
Do not skimp on time on this step.
Mock up is a mindset. Challenge yourself to mock up 3-4 times in order to know you have it right.
If you don’t take the time to do it right, your coupe to fastback conversion will not be successful.
Dimensions and Mock-Up Tips
- Your driveway or garage may not be level. Be sure and check this and add supports so that your coupe is sitting on a level surface before beginning the conversion.
- Adjust door gaps as needed so they line up during the conversion.
- The roof is flexible which makes it hard to take dims from. It’s actually a last piece.
- The rear fastback glass dictates 80% of where you are going to end up.
STEP 5- Verify What You are Going to Cut
Determine the important, necessary cuts. Just because someone else cuts it, doesn’t mean you have to.
Make sure to cut what you’re willing to replace.
For instance, the wheel wells may be in great shape and there is no reason to disturb them if so. This is all dependent upon the shape of the Mustang coupe body that you are starting with.
STEP 6- Add Bracing
Use angle iron to keep everything in place before you start cutting the sheet metal on the car. I’m not sure if one could really overdo it here , so when in doubt, add a brace.

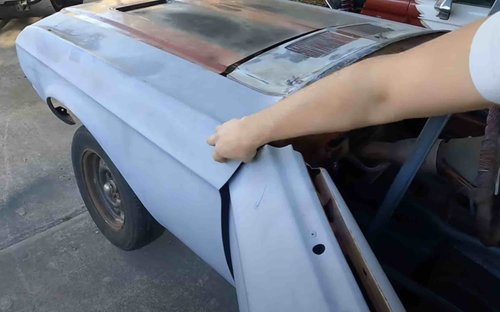
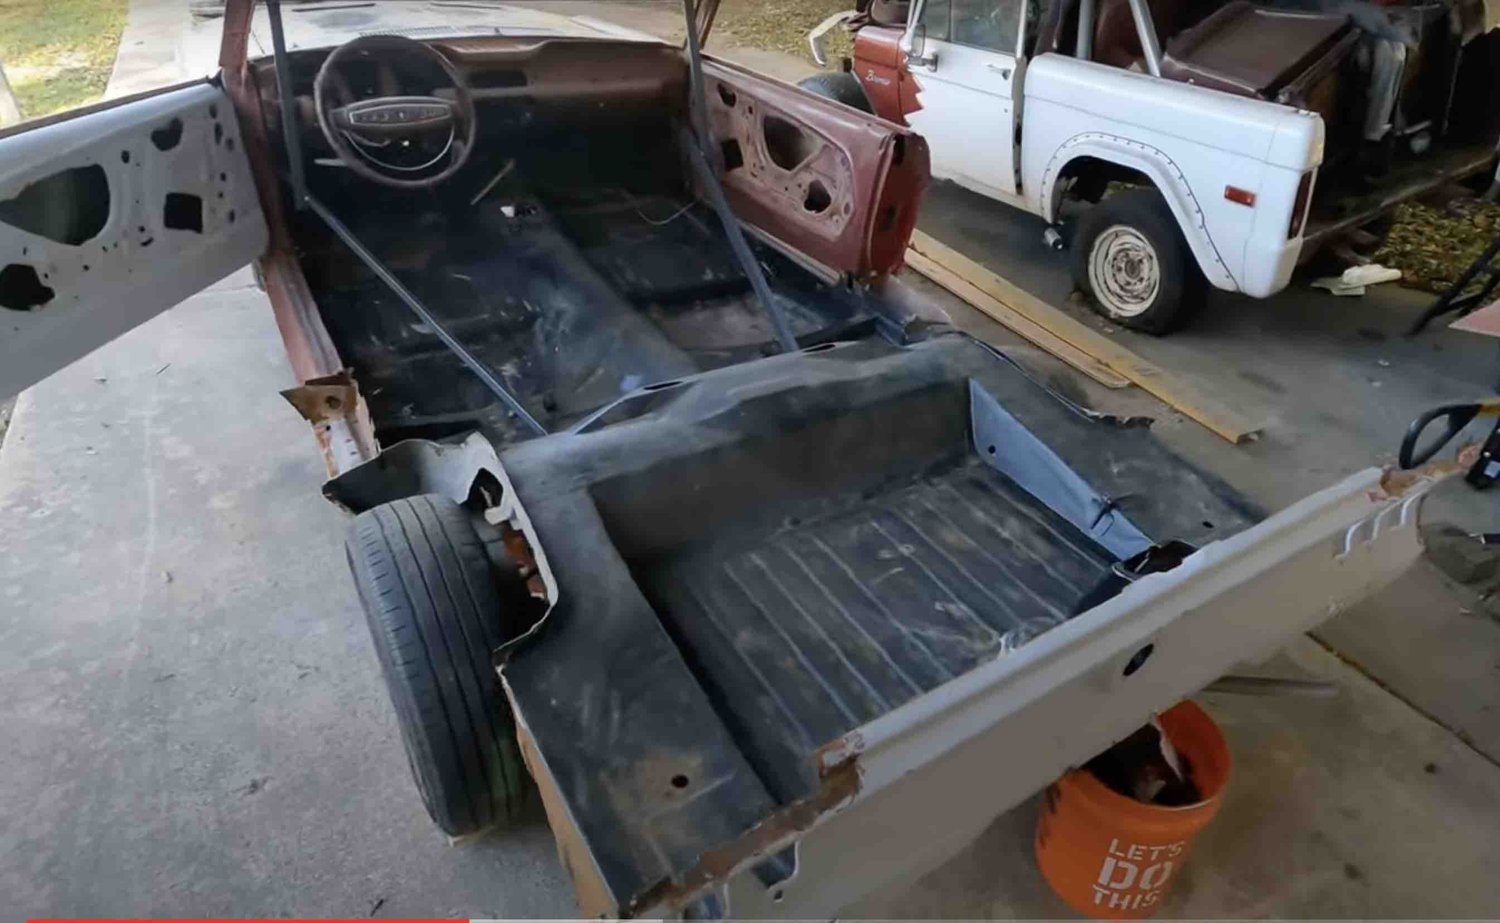
STEP 7- Time to Cut
When you feel comfortable with the dimensions and mock-up you’ve done, it’s time to bite the bullet and get to cutting some metal.
We started cutting at the roof.

Then we moved to the quarters.

Next, remove the roof, package tray, and the rest of the quarters.
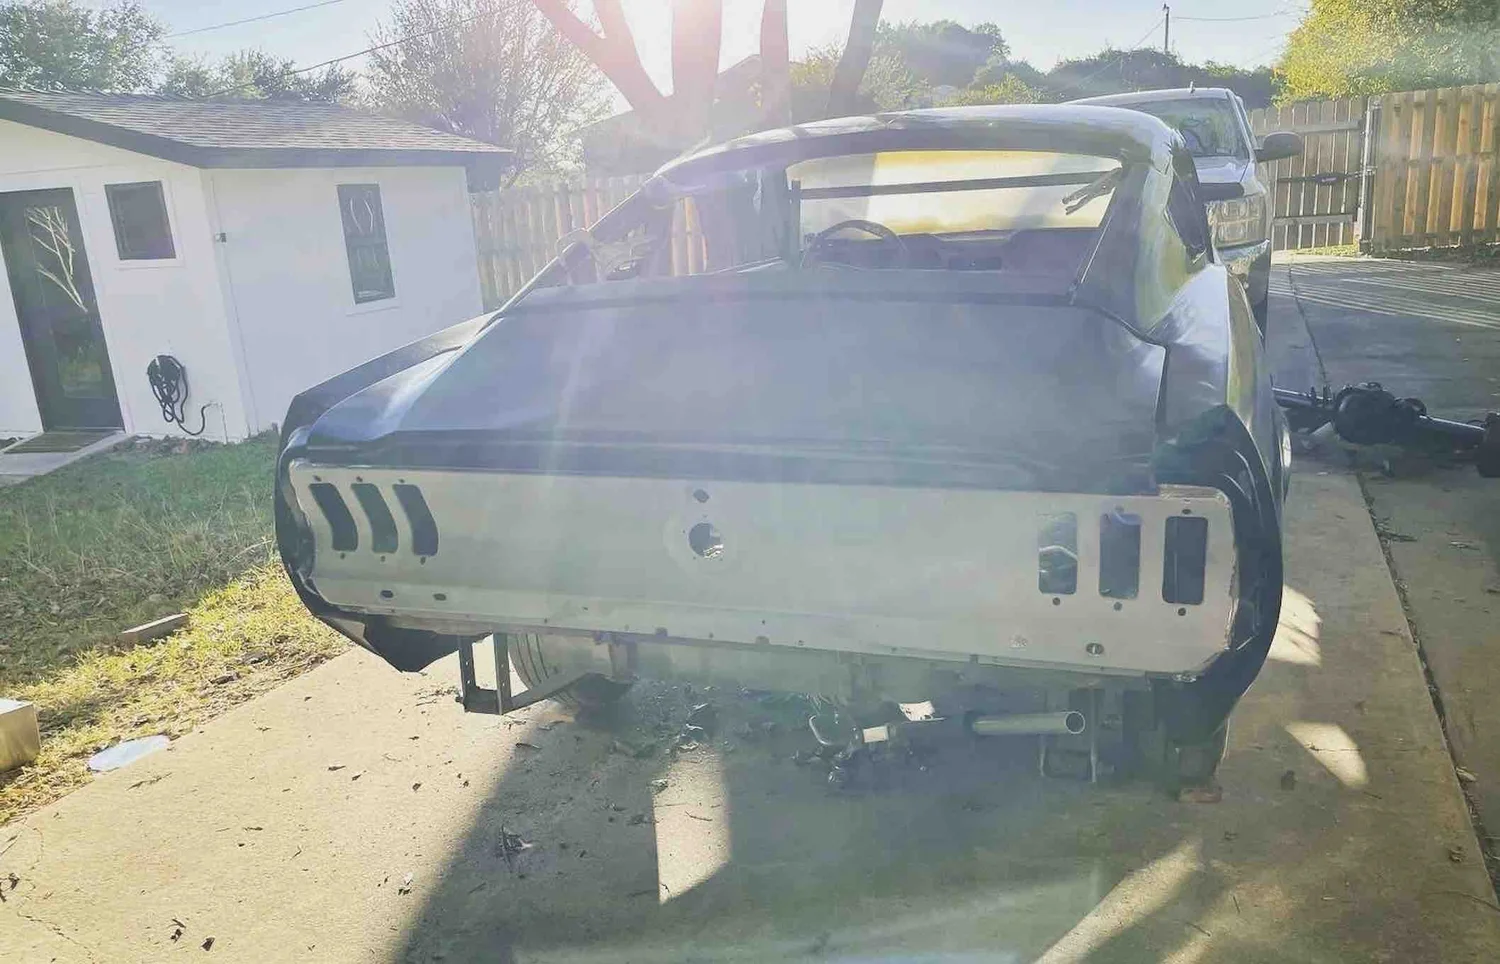
We were able to save much of our taillight piece by carefully cutting.
Then clean up anything else that needs trimming, such as around the wheel wells and where the roof meets the front windshield. We needed our spot weld remover to carefully tackle this task.

If you’re having trouble finding the spot welds, use a wire wheel or flapper wheel to run over the metal. That will reveal all of the spot welds.
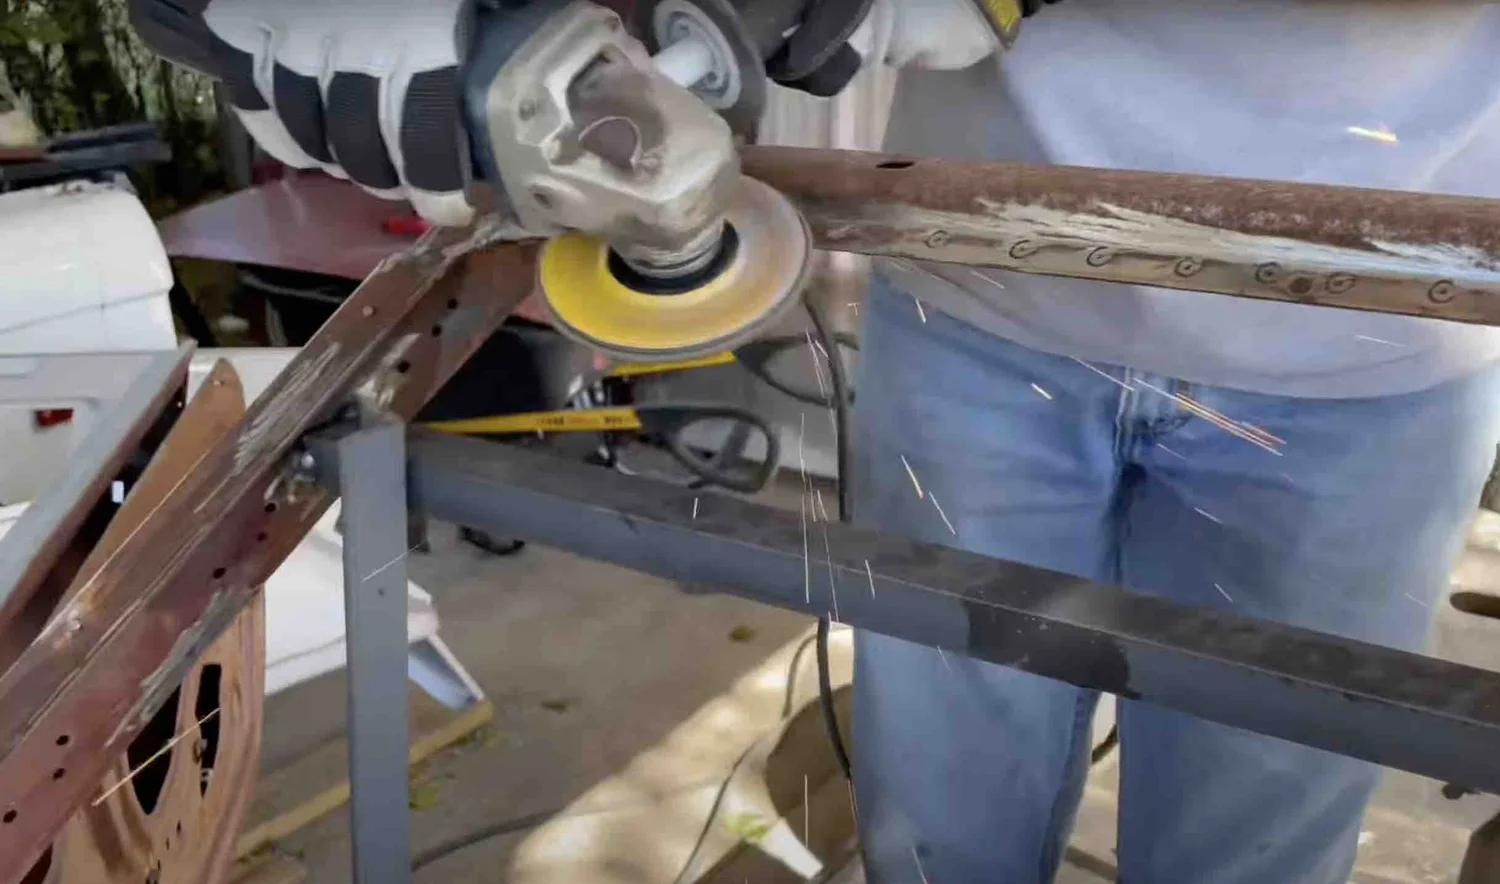
We then used an air hammer to gently remove the old drip rail.
REMEMBER: Try and save as much metal as you can!
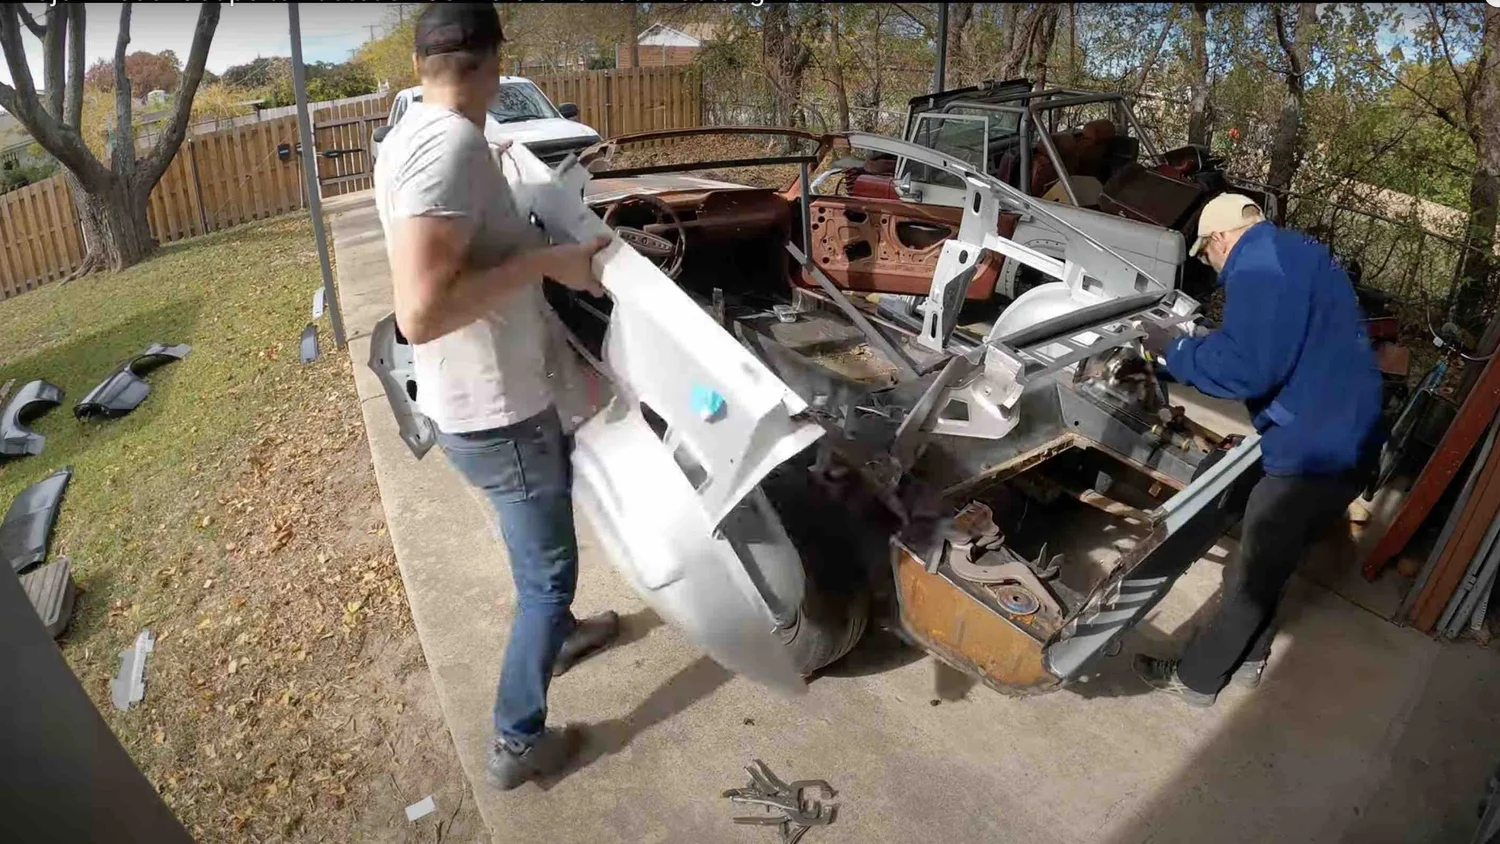
STEP 8- Fit the Structure
Take your time and line it up! We spent extra time on those door gaps.
Use some solid c-clamps to hold all the metal in place as you fit it onto your car. I also add some small Tek- Screws to hold it all in place. We’ll be adding more later, so don’t go crazy yet.
*Note: We didn’t use all of the metal from our kit. Since we still had some good, solid, rockers, we were able to keep the original. Keep it simple and don’t make more work for yourself.
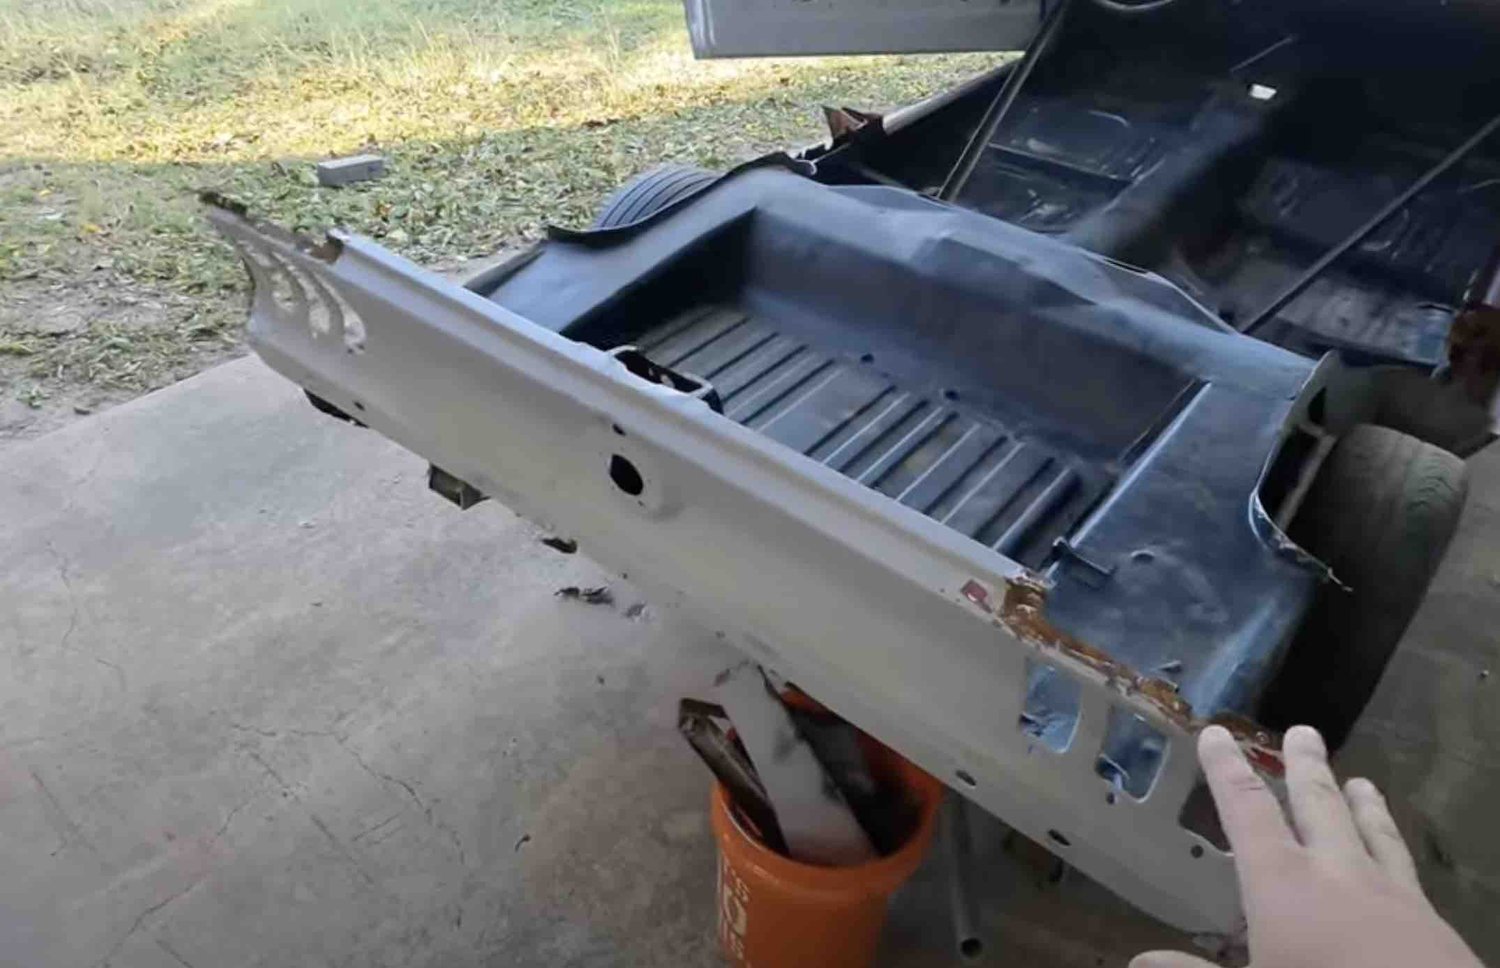
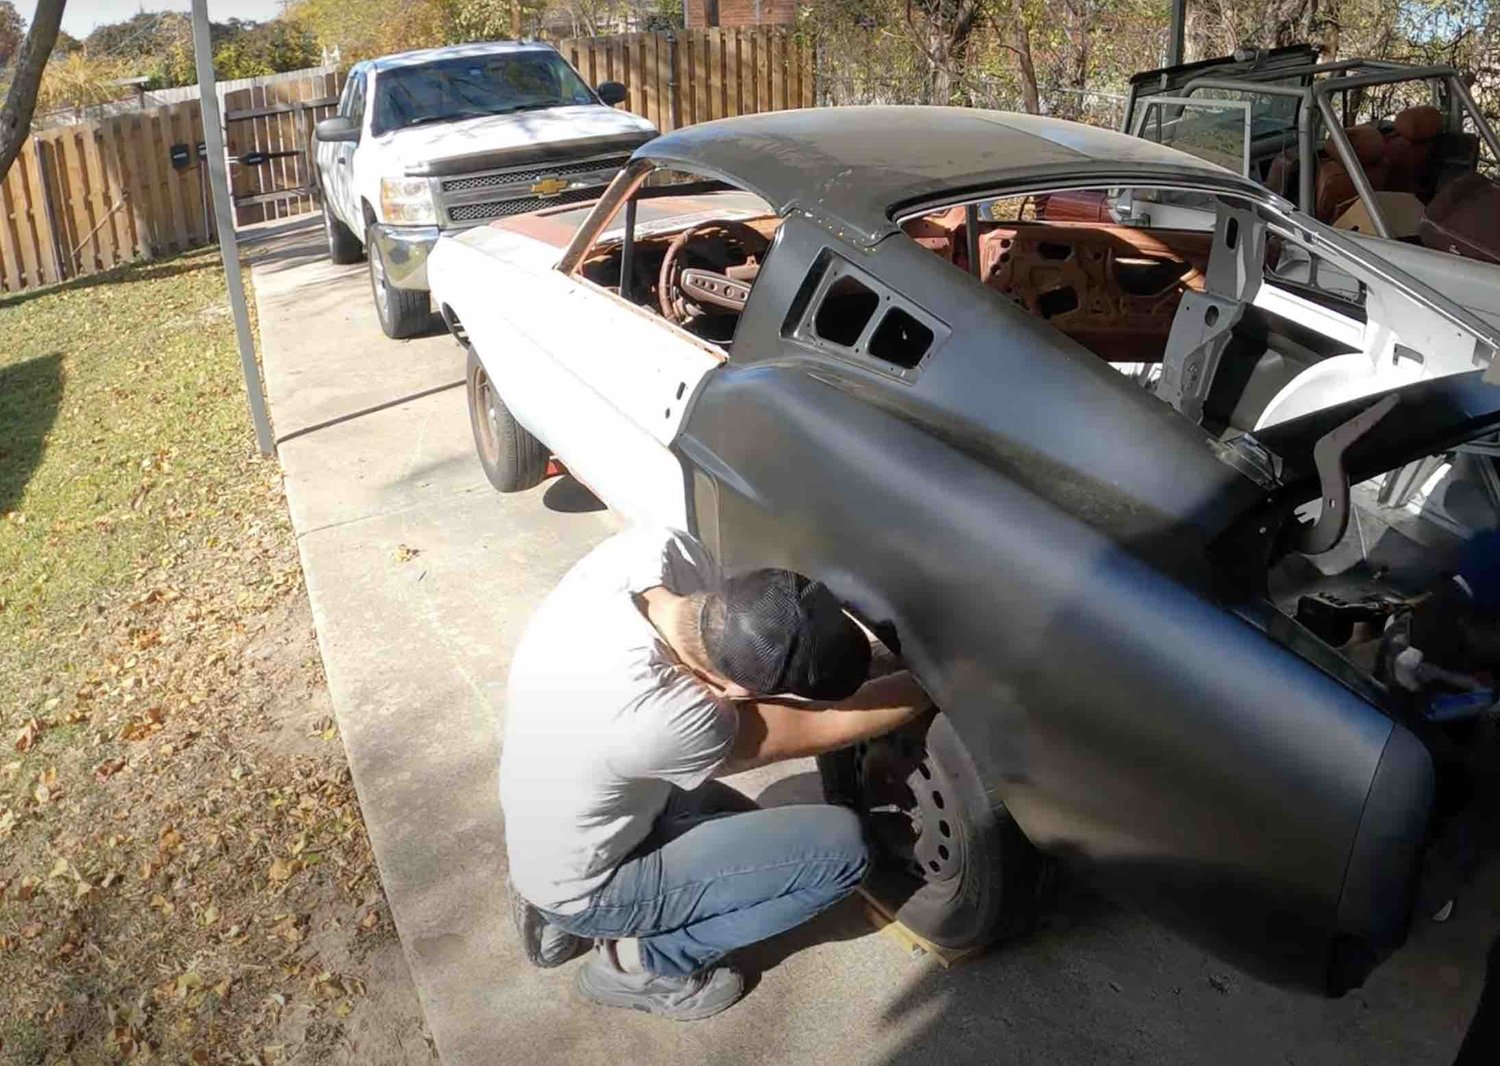
STEP 9- Add the Exterior Sheet Metal
Start at the back of the body and work your way forward. We started at the rear valance and added on from there. By starting at the back, everything was adjustable! You’ll need some levers to accomplish all of this.
After the valance was lined up, we went to the door gaps and made sure those were still on track.
Then do a rear glass test- fit before moving on to the rear deck lid. The trunk lid will need extra time and patience as you adjust it and the hinges to get it just right. This is very important if you want a killer fastback body.

*NOTE: BE PREPARED
You may need to do some relief cuts in the new sheet metal.
STEP 10- Mark-Up
Mark-up all of the spots that you think all of the new welds should go on your Mustang .
STEP 11- Take Off All the Metal… Again
Yes, you read that right. Take it all off your cut-up Mustang coupe.
STEP 12- Add Holes
After you have all the sheet metal off your Mustang, add 1/4″ to 3/16″ holes, so you know where to weld on the sheet metal. The flange hole punch really sped up this process, and highly recommend purchasing one for this conversion.

*Note: Mark your TEK screw holes
You don’t want to confuse your TEK screw holes with a hole that needs to be a spot weld. Otherwise, you will be searching for where that TEK screw should go when you’re trying to put the body together.
Eliminate future frustration with proper preparation.
STEP 13- Put It All Back Together
Reattach the inner structure and exterior sheet metal to your Mustang with your tek screws. We’ll be welding it all together next, so take your time and line up the frame, panels, and roof carefully. We’re about to make that fastback body a reality.
*Note: You don’t have to add the trunk lid until you’ve completed the welding.
STEP 14- Burn It In
It’s finally time to weld all that metal on your coupe to fastback conversion. We used a MIG welder. You can see below how we spot welded on all of the holes that we punched when the metal was off. This made this such a simple process when we got to the welding.

Taking the time to prep your Mustang carefully is key to a successful coupe to fastback conversion.
Once all the metal is welded, the Mustang coupe to fastback conversion process is COMPLETE!
WRAP-UP: What are the next steps?
We followed up our coupe to fastback conversion by getting our 1968 Mustang ready for some paint by treating the rust and doing some body work on the upper quarter panels where they meet the roof. And then we epoxy primed it.

The next steps are up to you! Enjoy your newly converted fastback. The restoration options are endless, and you’ll have a blast customizing your Mustang.
SEE YOU ON THE ROAD!
Videos
To see more about how completed this conversion, check out our videos from both of our Fastback Conversion projects:


